APUE

APUE NOTE

lseek

Function Prototype

1
2
3
#include <unistd.h>
off_t lseek(int fd, off_t offset, int whence);
// 返回:若成功为新的文件位移,若出错为- 1

Whence

  • 若wh enc e是SEEK_S E T,则将该文件的位移量设置为距文件开始处 offset 个字节。
  • 若whence是SEEK_ CUR,则将该文件的位移量设置为其当前值加offset, offset可为正或负。
  • 若when ce是SEEK_END,则将该文件的位移量设置为文件长度加offset, offset可为正或负。
  • 若lse ek成功执行,则返回新的文件位移量,为此可以用下列方式确定一个打开文件的当前位移量:
    1
    2
    off_t currpos;
    currpos = lseek(fd, 0, SEEK_CUR);

readv, writev

readv和writev函数用于在一个函数调用中读、写多个非连续缓存. 有时也将这两个函数称为散布读(scatter read)和聚集写(gather write).

Function Prototype

1
2
3
4
#include <sys/uio.h>
ssize_t readv(int fd, const struct iovec *iov, int iovcnt);
ssize_t writev(int fd, const struct iovec *iov, int iovcnt);
//两个函数返回:已读、写的字节数,若出错则为 - 1

这两个函数的第二个参数是指向 iovec结构数组的一个指针:

1
2
3
4
struct iovec {
void* iov_base; /* starting address of buffer */
size_t iov_len; /* size of buffer */
};

iovec

  • writev以顺序iov[0], iov[1]至iov[iovcnt-1] 从缓存中聚集输出数据. writev返回输出的字节总数,它应等于所有缓存长度之和.
  • readv则将读入的数据按上述同样顺序散布到缓存中. readv总是先填满一个缓存, 然后再填写下一个. readv返回读得的总字节数. 如果遇到文件结尾,已无数据可读, 则返回0.

getopt

Function Prototype

1
2
3
int getopt(int argc,char * const argv[ ],const char * optstring);
extern char *optarg;
extern int optind, opterr, optopt;

getopt() 所设置的全局变量包括:

1
2
3
optarg——指向当前选项参数(如果有)的指针。 
optind——再次调用 getopt() 时的下一个 argv 指针的索引。
optopt——最后一个未知选项。

Global Variable in getopt()

optarg —— 指向当前选项参数(如果有)的指针。 
optind —— 再次调用 getopt() 时的下一个 argv 指针的索引 
optopt —— 最后一个未知选项

Complement

optstring中的指定的内容的意义
例如 getopt(argc, argv, "ab:c:de::");
    1.单个字符,表示选项,(如上例中的abcde各为一个选项)
    2.单个字符后接一个冒号:表示该选项后必须跟一个参数。参数紧跟在选项后或者以空格隔开。该参数的指针赋给optarg。(如上例中的b:c:)
    3.单个字符后跟两个冒号,表示该选项后可以跟一个参数,也可以不跟。如果跟一个参数,参数必须紧跟在选项后不能以空格隔开。该参数的指针赋给optarg。(如上例中的e::,如果没有跟参数,则optarg = NULL)
Leetcode Shell

Some interesting shell script on Leetcode

Word Frequency

1
grep -oE '[a-z]+' words.txt | sort | uniq -c | sort -r | awk '{print $2" "$1}'

Transpose File

1
2
3
4
5
6
7
8
9
10
11
12
13
14
15
16
## 任何在BEGIN之后列出的操作(在{}内)将在Unix awk开始扫描输入之前执行,而END之后列出的操作将在扫描完全部的输入之后执行。因此,通常使用BEGIN来显示变量和预置(初始化)变量,使用END来输出最终结果。
awk '
{
for (i = 1; i <= NF; i++) {
if(NR == 1) {
s[i] = $i;
} else {
s[i] = s[i] " " $i;
}
}
}
END {
for (i = 1; s[i] != ""; i++) {
print s[i];
}
}' file.txt

Valid Phone Numbers

1
grep -Eo '^(\([0-9]{3}\) ){1}[0-9]{3}-[0-9]{4}$|^([0-9]{3}-){2}[0-9]{4}$' file.txt

Tenth Line

1
sed -n  '10p' file.txt

const_cast [TODO]

const_cast

three examples to explain the usage of const_cast

[Code]

1
2
3
4
5
6
7
8
9
10
11
12
13
14
15
16
17
18
19
20
21
22
23
24
25
26
27
28
29
30
31
32
33
34
35
36
37
38
39
40
41
42
43
44
45
46
47
48
49
50
51
52
53
/*************************************************************************
> File Name: mod_const.cpp
> Author: zyy
> Mail: zyy34472@gmail.com
************************************************************************/


#include <stdio.h>
#include <iostream>
using namespace std;

#define NAME2STR(_VAR_) (#_VAR_)
#define OUT(_VAR_) cout << NAME2STR(_VAR_) << ": " << _VAR_ << endl

int main (int argc, char** argv)
{

cout << "const_cast" << endl << endl;
const volatile int a1 = 1;
int &b1 = const_cast<int&>(a1);
cout << "[const volatile int -> int&]" << endl;
OUT(((&a1) == (&b1)));
OUT(&a1);
printf("But use printf, &a = %p\n", &a1);
OUT(&b1);
b1 = 2;
OUT(a1);
OUT(b1);
cout << endl << endl; ;

const int a2 = 1;
int &b2 = const_cast<int&>(a2);
cout << "[const int -> int&]" << endl;
OUT(((&a2) == (&b2)));
OUT(&a2);
OUT(&b2);
b2 = 2;
OUT(a2);
OUT(b2);
cout << endl << endl;

int a3 = 1;
const int &b3 = a3;
int &x = const_cast<int&>(b3);
cout << "[int -> const int&]" << endl;
//int* const b2 = &a2;
OUT(&a3);
OUT(&x);
x = 20;
OUT(a3);
OUT(x);
cout << endl << endl;

return 0;
}

Video Capture

Capture Video data from camera and save

Press ESC to exit program.

1
2
3
4
5
6
7
8
9
10
11
12
13
14
15
16
17
18
19
20
21
22
23
24
25
26
27
28
29
30
31
32
33
34
35
36
37
38
39
40
#include <iostream>
#include <string>
#include <opencv2/opencv.hpp>
#include <video.hpp>

using namespace std;
using namespace cv;

int main(int argc, char *argv[])
{

if (argc < 2) {
cout << "[Usage]" << endl;
cout << "\t ./VideoCapture save_filename" << endl;
return -1;
}
VideoCapture vc;
vc.open(0);
if (!vc.isOpened()) {
cout << "[ERROR] Camera can't open" << endl;
return -2;
}
VideoWriter vw;
vw.open( argv[1], // Saved filename
(int)vc.get( CV_CAP_PROP_FOURCC ), // Windows:CV_FOURCC_PROMPT(-1) can select parameters in a Dialog
(double)vc.get( CV_CAP_PROP_FPS ), // FPS
cv::Size( (int)vc.get( CV_CAP_PROP_FRAME_WIDTH ), (int)vc.get( CV_CAP_PROP_FRAME_HEIGHT ) ), // Resolution
true ); // Color or not);
if (!vw.isOpened()) {
cout << "[ERROR] Saved file can't open" << endl;
return -3;
}
//Capture
Mat frame;
for (long long framecnt = 0; vc.read(frame) && waitKey(33) != 27; framecnt++) {
vw << frame;
}
vc.release();
vw.release();
return 0;
}

Depth Segmentation

A efficient depth segmentation base on Region growing

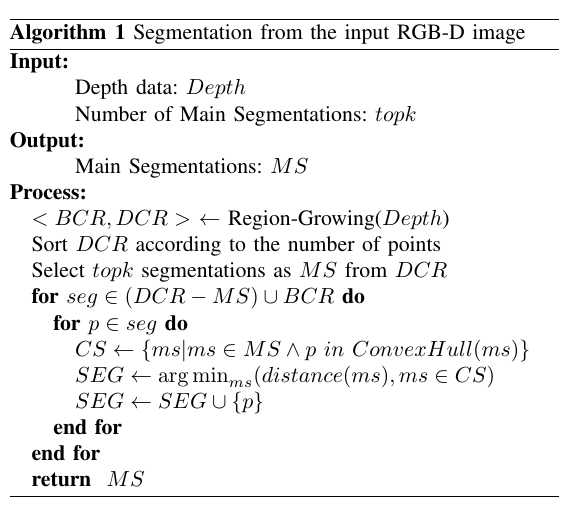
Main idea: merge small regions and black regions to Main regions.

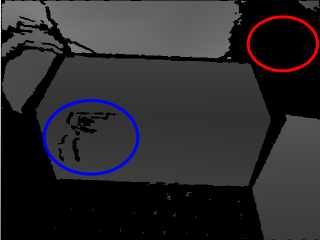
The image on the left is the Color source and the right is its Depth image, which are captured by an Intel Realsense F200 camera. Note that the point which is brighter implies it is farer from the camera. However, the point may become black once it is out of camera range. The red region denotes unreliable points representing too far or too close positions, which exceed the effective distance range of the camera (out of 0.2m - 1.2m). The blue region implies that the Realsense camera cannot ensure the distance is effective due to diffuse reflection.

Color Depth
Color Depth marked

The initial segmentations with topk=5 are shown in BeforeMerging. After merging small regions and black regions, we obtain the results as shown in Segmentation. The colors are random generated to mark the segmentations in BeforeMerging and Segmentation, respectively. The black regions in Segmentation are unmarked, which means that they are either unreliable points in Segmentation or do not belong to any main segment.

BeforeMerging Segmentation
Before merge Segmentation

And the whole algorithm flow is shown as follow:
Algorithm